Embedding an Interactive ArcGIS Map Inside a Native Application
If you've been following GeoBlazor, you know it's designed to bring ArcGIS mapping to Blazor web applications. But what if you want a native application — something that runs on Windows, Android, iOS, and macOS — with a real ArcGIS map embedded inside it? That's exactly what we're going to build in this post.
It turns out we need to build a few bridges to get there. Uno Platform is a cross-platform UI framework that lets you write a single XAML-based application targeting every major platform. Uno has a feature called MAUI Embedding that allows you to host .NET MAUI controls inside your Uno app. And since MAUI provides BlazorWebView — a control that renders Blazor components natively — we can use it to bridge GeoBlazor into an Uno application.
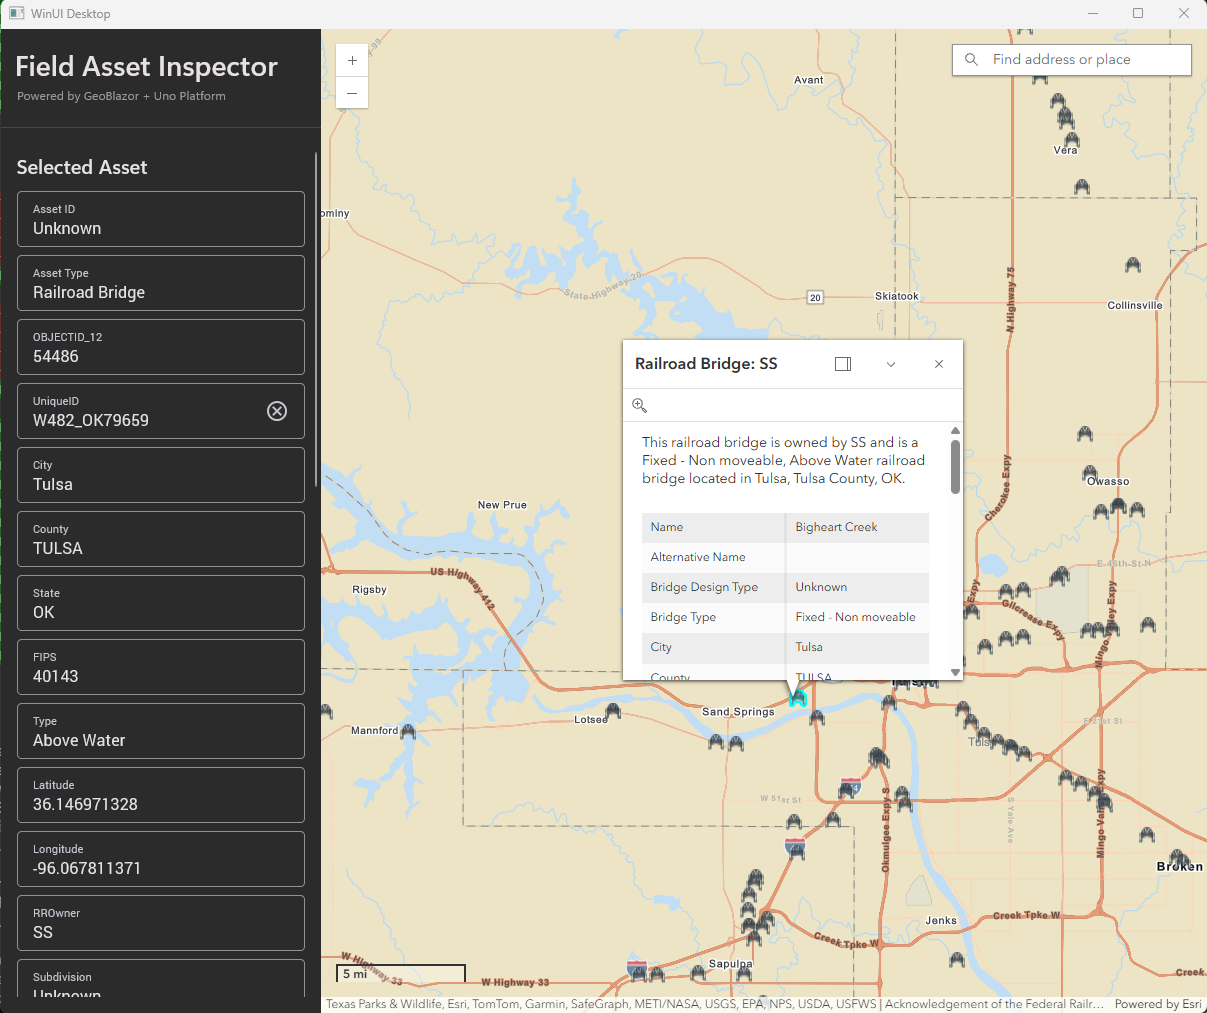
To demonstrate this, we'll build a sample "Field Asset Inspector" app — the kind of application a utility company might hand to inspectors who need to view infrastructure on a map and pull up asset details in the field. It combines a native XAML sidebar with an interactive ArcGIS map, where clicking a feature on the map populates the sidebar with its attributes. And fittingly, the data we'll be mapping is railroad bridges — because this post is all about bridging technologies together. One codebase, four platforms.
Let's build it. Jump to the video demo below.
Prerequisites
Before we start, you'll need:
- .NET 10 SDK
- The Uno Platform templates (
dotnet new install Uno.Templates) - An ArcGIS Account - if you're new to ArcGIS, you can get started for free with the Location Platform
- A GeoBlazor Registration Key. Sign up for a free GeoBlazor Core key, or purchase a license for GeoBlazor Pro if you want to add Pro features like truly editing ArcGIS data
The Architecture
Our solution has three projects. That sounds like a lot, but each one has exactly one job:
| Project | Job |
|---|---|
| FieldAssetInspector | The Uno Platform host — native XAML shell with a sidebar |
| FieldAssetInspector.MauiControls | The bridge — wraps a BlazorWebView in a MAUI ContentView |
| FieldAssetInspector.Razor | The map — a plain Razor Class Library with GeoBlazor components |
The embedding chain looks like this:
Uno XAML (MainPage) → MauiHost → BlazorWebView → GeoBlazor MapView
Why three projects? Uno Platform doesn't have its own BlazorWebView, but MAUI does. Uno's MAUI Embedding feature lets us host any MAUI control inside an Uno page. So the MauiControls project is our first bridge — it wraps a BlazorWebView in a MAUI ContentView that Uno can embed with a single MauiHost tag. The Razor library keeps all the map code completely platform-agnostic — it doesn't know or care that it's running inside Uno.
Step 1: Create the Uno Project
Start by creating a new Uno Platform app with the MAUI Embedding feature enabled:
# Create the Uno Platform app
dotnet new unoapp -o FieldAssetInspector \
  -tfm net10.0 \
  -preset blank \
  -platforms "android ios windows" \
  -maui \
  -theme material \
  -presentation mvux \
  -toolkit \
  -di \
  -config \
  -markup xaml
# Create the Uno Platform app
dotnet new unoapp -o FieldAssetInspector \
  -tfm net10.0 \
  -preset blank \
  -platforms "android ios windows" \
  -maui \
  -theme material \
  -presentation mvux \
  -toolkit \
  -di \
  -config \
  -markup xaml
The -maui flag is the critical one — it enables MAUI Embedding so we can host MAUI controls inside Uno. I also chose -theme material for Uno's Material Design look, -di for dependency injection, -config to wire up appsettings.json, and -toolkit for some handy extra controls.
Note: maccatalyst doesn't appear in the command — the Uno template automatically includes it when you select ios. In addition, Uno has a WebAssembly target, which doesn't support the MAUI Embeddings. However, since GeoBlazor runs directly in Blazor Wasm, it would make more sense to build a simple Blazor application for that target.
The template generates two projects: the main Uno app and a MauiControls class library. It also creates a global.json to pin the Uno SDK version:
{
  "sdk": {
    "version": "10.0.0",
    "rollForward": "latestMinor"
  },
  "msbuild-sdks": {
    "Uno.Sdk": "6.5.31"
  }
}
{
  "sdk": {
    "version": "10.0.0",
    "rollForward": "latestMinor"
  },
  "msbuild-sdks": {
    "Uno.Sdk": "6.5.31"
  }
}
Let's look at what the template generated. The main project uses Uno.Sdk with the single-project multi-platform model. You can see our choices reflected in the UnoFeatures list — including MauiEmbedding:
<Project Sdk="Uno.Sdk"> <PropertyGroup> <TargetFrameworks>net10.0-ios;net10.0-maccatalyst;net10.0-android</TargetFrameworks> <TargetFrameworks Condition="$([MSBuild]::IsOSPlatform('Windows'))"> $(TargetFrameworks);net10.0-windows10.0.26100 </TargetFrameworks> <OutputType>Exe</OutputType> <UnoSingleProject>true</UnoSingleProject> <ApplicationTitle>Field Asset Inspector</ApplicationTitle> <ApplicationId>com.dymaptic.fieldassetinspector</ApplicationId> <ApplicationDisplayVersion>1.0.0</ApplicationDisplayVersion> <ApplicationVersion>1</ApplicationVersion> <UnoFeatures> Material; Hosting; Toolkit; Logging; MVUX; MauiEmbedding; </UnoFeatures> </PropertyGroup> <PropertyGroup> <UserSecretsId>60754166-2e08-4c50-bc9b-09061b92213c</UserSecretsId> </PropertyGroup> <ItemGroup> <EmbeddedResource Include="appsettings.json" /> </ItemGroup> <ItemGroup> <ProjectReference Include="..\FieldAssetInspector.MauiControls\FieldAssetInspector.MauiControls.csproj" /> </ItemGroup> <ItemGroup> <PackageReference Include="Microsoft.Extensions.Configuration.Json" /> <PackageReference Include="Microsoft.Extensions.Configuration.Binder" /> </ItemGroup> <!-- Workaround: WinUI XAML compiler generates XamlTypeInfo.g.cs that references MAUI TemplatedView.Children, which is error-obsolete (CS0619) in MAUI 10. This target patches the generated file before C# compilation. Tracked upstream: https://github.com/microsoft/microsoft-ui-xaml/issues/5812 --> <Target Name="PatchXamlTypeInfo" BeforeTargets="CoreCompile" Condition="$([MSBuild]::GetTargetPlatformIdentifier('$(TargetFramework)')) == 'windows'"> <Exec Command="powershell -NoProfile -Command "$f='$(IntermediateOutputPath)XamlTypeInfo.g.cs'; if(Test-Path $f){(Get-Content $f -Raw) -replace 'return that\.Children;','return null;' | Set-Content $f -NoNewline}"" IgnoreExitCode="true" /> </Target> </Project>
<Project Sdk="Uno.Sdk"> <PropertyGroup> <TargetFrameworks>net10.0-ios;net10.0-maccatalyst;net10.0-android</TargetFrameworks> <TargetFrameworks Condition="$([MSBuild]::IsOSPlatform('Windows'))"> $(TargetFrameworks);net10.0-windows10.0.26100 </TargetFrameworks> <OutputType>Exe</OutputType> <UnoSingleProject>true</UnoSingleProject> <ApplicationTitle>Field Asset Inspector</ApplicationTitle> <ApplicationId>com.dymaptic.fieldassetinspector</ApplicationId> <ApplicationDisplayVersion>1.0.0</ApplicationDisplayVersion> <ApplicationVersion>1</ApplicationVersion> <UnoFeatures> Material; Hosting; Toolkit; Logging; MVUX; MauiEmbedding; </UnoFeatures> </PropertyGroup> <PropertyGroup> <UserSecretsId>60754166-2e08-4c50-bc9b-09061b92213c</UserSecretsId> </PropertyGroup> <ItemGroup> <EmbeddedResource Include="appsettings.json" /> </ItemGroup> <ItemGroup> <ProjectReference Include="..\FieldAssetInspector.MauiControls\FieldAssetInspector.MauiControls.csproj" /> </ItemGroup> <ItemGroup> <PackageReference Include="Microsoft.Extensions.Configuration.Json" /> <PackageReference Include="Microsoft.Extensions.Configuration.Binder" /> </ItemGroup> <!-- Workaround: WinUI XAML compiler generates XamlTypeInfo.g.cs that references MAUI TemplatedView.Children, which is error-obsolete (CS0619) in MAUI 10. This target patches the generated file before C# compilation. Tracked upstream: https://github.com/microsoft/microsoft-ui-xaml/issues/5812 --> <Target Name="PatchXamlTypeInfo" BeforeTargets="CoreCompile" Condition="$([MSBuild]::GetTargetPlatformIdentifier('$(TargetFramework)')) == 'windows'"> <Exec Command="powershell -NoProfile -Command "$f='$(IntermediateOutputPath)XamlTypeInfo.g.cs'; if(Test-Path $f){(Get-Content $f -Raw) -replace 'return that\.Children;','return null;' | Set-Content $f -NoNewline}"" IgnoreExitCode="true" /> </Target> </Project>
I added appsettings.json as an embedded resource item, so that configuration settings can be shipped with the app binary rather than as a loose file. I also added UserSecrets to the PropertyGroup to enable IConfigurationBuilder.AddUserSecrets() in App.xaml.cs, so that we can use that to store our api keys during development.
    <PropertyGroup>
        <UserSecretsId>60754166-2e08-4c50-bc9b-09061b92213c</UserSecretsId>
    </PropertyGroup>

    <ItemGroup>
        <EmbeddedResource Include="appsettings.json" />
    </ItemGroup>
    <PropertyGroup>
        <UserSecretsId>60754166-2e08-4c50-bc9b-09061b92213c</UserSecretsId>
    </PropertyGroup>

    <ItemGroup>
        <EmbeddedResource Include="appsettings.json" />
    </ItemGroup>
Note: If you're building on Windows with .NET 10, you'll need the workaround target shown above for a known issue where the WinUI XAML compiler generates code referencing an obsolete MAUI API. You can track the upstream fix at microsoft-ui-xaml#5812.
Step 2: Add the Razor Class Library
The template gave us the Uno host and the MauiControls bridge, but we still need a place for our Blazor map code. Let's create a Razor Class Library and add GeoBlazor to it:
# Create the Razor Class Library
dotnet new razorclasslib -o FieldAssetInspector.Razor -f net10.0

# Add to the solution
dotnet sln add FieldAssetInspector.Razor

# Navigate to the new project folder
cd FieldAssetInspector.Razor

# Add the GeoBlazor package reference
dotnet add package dymaptic.GeoBlazor.Core

# Navigate back to the solution root
cd ..
This is the cleanest project in the solution:
<Project Sdk="Microsoft.NET.Sdk.Razor">
    <PropertyGroup>
        <TargetFramework>net10.0</TargetFramework>
        <SupportedPlatform Include="browser" />
    </PropertyGroup>

    <ItemGroup>
        <PackageReference Include="dymaptic.GeoBlazor.Core" />
        <PackageReference Include="Microsoft.AspNetCore.Components.Web" />
    </ItemGroup>
</Project>
No platform-specific code. No conditional compilation. Just Blazor and GeoBlazor. This is where all of our map logic will live.
Step 3: Set Up the MAUI Bridge
The template already created FieldAssetInspector.MauiControls for us, but we need to add the BlazorWebView packages and a reference to our new Razor library:
# Navigate to the MauiControls project folder
cd FieldAssetInspector.MauiControls

# Add the MAUI package for BlazorWebView
dotnet add package Microsoft.AspNetCore.Components.WebView.Maui

# Add a reference to the new Razor Class library
dotnet add reference ../FieldAssetInspector.Razor/FieldAssetInspector.Razor.csproj

# Navigate back to the solution root
cd ..
The resulting .csproj file multi-targets all the same platforms as the main Uno project:
<Project Sdk="Microsoft.NET.Sdk.Razor">
    <PropertyGroup>
        <TargetFrameworks>net10.0-ios;net10.0-maccatalyst;net10.0-android</TargetFrameworks>
        <TargetFrameworks Condition="$([MSBuild]::IsOSPlatform('Windows'))">
            $(TargetFrameworks);net10.0-windows10.0.26100
        </TargetFrameworks>
        <UseMaui>true</UseMaui>
        <SingleProject>true</SingleProject>
    </PropertyGroup>

    <ItemGroup>
        <PackageReference Include="Microsoft.Maui.Controls" />
        <PackageReference Include="Microsoft.AspNetCore.Components.WebView.Maui" />
    </ItemGroup>

    <ItemGroup>
        <ProjectReference Include="..\FieldAssetInspector.Razor\FieldAssetInspector.Razor.csproj" />
    </ItemGroup>
</Project>
Inside the FieldAssetInspector.MauiControls project, we create a single MAUI ContentView called EmbeddedMapView that wraps a BlazorWebView:
<?xml version="1.0" encoding="utf-8" ?>
<ContentView xmlns="http://schemas.microsoft.com/dotnet/2021/maui"
             xmlns:x="http://schemas.microsoft.com/winfx/2009/xaml"
             xmlns:blazor="clr-namespace:Microsoft.AspNetCore.Components.WebView.Maui;assembly=Microsoft.AspNetCore.Components.WebView.Maui"
             xmlns:razor="clr-namespace:FieldAssetInspector.Razor;assembly=FieldAssetInspector.Razor"
             x:Class="FieldAssetInspector.MauiControls.EmbeddedMapView">

    <blazor:BlazorWebView HostPage="wwwroot/index.html">
        <blazor:BlazorWebView.RootComponents>
            <blazor:RootComponent Selector="#app"
                                  ComponentType="{x:Type razor:MapPage}" />
        </blazor:BlazorWebView.RootComponents>
    </blazor:BlazorWebView>

</ContentView>
The BlazorWebView points to our MapPage Razor component and loads from wwwroot/index.html, which references the GeoBlazor static assets:
<!DOCTYPE html>
<html lang="en">
<head>
    <meta charset="utf-8" />
    <meta name="viewport" content="width=device-width, initial-scale=1.0" />
    <title>Field Asset Inspector</title>
    <base href="/" />
    <link href="_content/FieldAssetInspector.Razor/css/app.css" rel="stylesheet" />
    <link href="_content/dymaptic.GeoBlazor.Core" />
</head>
<body>
    <div id="app">Loading map...</div>
    <script src="_framework/blazor.webview.js" autostart="false"></script>
</body>
</html>
That's the entire bridge project. Its only job is to give Uno access to BlazorWebView.
Step 4: Wire Up Configuration and DI
Now we need to connect everything in App.xaml.cs. This is where the three projects actually meet. The root FieldAssetInspector Uno app reads appsettings.json from its embedded resources, builds an IConfiguration instance, and passes it into both the Uno host and the MAUI embedding setup:
public partial class App : Microsoft.UI.Xaml.Application
{
    public App()
    {
        this.InitializeComponent();
    }

    protected override void OnLaunched(LaunchActivatedEventArgs args)
    {
        base.OnLaunched(args);

        // Build IConfiguration from embedded appsettings.json (one read, use everywhere)
        // or User Secrets during development
        Assembly assembly = typeof(App).Assembly;
        using Stream stream = assembly.GetManifestResourceStream(typeof(App),
            "appsettings.json")!;

        IConfiguration appConfig = new ConfigurationBuilder()
            .AddJsonStream(stream)
            .AddUserSecrets<App>()
            .Build();

        IApplicationBuilder appBuilder = this.CreateBuilder(args)
            .Configure(host =>
            {
                host.ConfigureAppConfiguration((context, builder) =>
                {
                    builder.AddConfiguration(appConfig);
                });
                host.ConfigureServices((context, services) => { services.AddSingleton<HttpClient>(); });
            })
            .UseMauiEmbedding<Application>(maui =>
            {
                maui.Services.AddSingleton<IConfiguration>(appConfig);
                maui.Services.AddMauiBlazorWebView();
                maui.Services.AddGeoBlazor(appConfig);
                maui.Services.AddSingleton<AssetSelectionService>();
#if DEBUG
                maui.Services.AddBlazorWebViewDeveloperTools();
#endif
            });

        var host = appBuilder.Build();

        var selection = host.Services.GetRequiredService<AssetSelectionService>();
        appBuilder.Window.Content = new MainPage(selection);
        appBuilder.Window.Activate();
    }
}
Inside UseMauiEmbedding above, AddMauiBlazorWebView() registers the BlazorWebView control and AddGeoBlazor(appConfig) registers GeoBlazor's services and reads the API key from configuration. Since we pass the same IConfiguration instance to both containers, a single appsettings.json (or User Secrets) feeds the entire app:
{
  "ArcGISApiKey": "YOUR_ARCGIS_API_KEY",
  "GeoBlazor": {
    "RegistrationKey": "YOUR_GEOBLAZOR_REGISTRATION_KEY"
  }
}
{
  "ArcGISApiKey": "YOUR_ARCGIS_API_KEY",
  "GeoBlazor": {
    "RegistrationKey": "YOUR_GEOBLAZOR_REGISTRATION_KEY"
  }
}
We also need to add GeoBlazor using statements to the _Imports.razor file in the FieldAssetInspector.Razor library. Putting these all in a single file helps keep the Razor code clean and organized:
@using dymaptic.GeoBlazor.Core
@using dymaptic.GeoBlazor.Core.Components
@using dymaptic.GeoBlazor.Core.Components.Geometries
@using dymaptic.GeoBlazor.Core.Components.Layers
@using dymaptic.GeoBlazor.Core.Components.Renderers
@using dymaptic.GeoBlazor.Core.Components.Symbols
@using dymaptic.GeoBlazor.Core.Components.Views
@using dymaptic.GeoBlazor.Core.Components.Widgets
@using dymaptic.GeoBlazor.Core.Enums
@using dymaptic.GeoBlazor.Core.Events
@using dymaptic.GeoBlazor.Core.Model
@using dymaptic.GeoBlazor.Core.Results
Step 5: Build the Map
Now for the fun part. The MapPage.razor component in FieldAssetInspector.Razor defines the map, a feature layer of railroad bridges, and click interaction:
@namespace FieldAssetInspector.Razor
@inject AssetSelectionService Selection

<div class="map-container">
    @* Center on Oklahoma area with railroad infrastructure data *@
    <MapView @ref="_mapView"
             Class="map-view"
             OnClick="OnMapClick"
             Longitude="-95.9979" Latitude="36.1540"
             Zoom="10"
             Style="height: 100%; width: 100%;">

        <Map>
            <Basemap>
                <BasemapStyle Name="BasemapStyleName.ArcgisStreets"/>
            </Basemap>

            <FeatureLayer @ref="_bridgesLayer"
                          OutFields="@(["*"])"
                          Title="Railroad Bridges">
                <PortalItem PortalItemId="c553cf96679d4454b1d60aa0b6a268f9" />
                <SimpleRenderer>
                    <PictureMarkerSymbol Url="images/railroad_bridge.png"></PictureMarkerSymbol>
                </SimpleRenderer>
            </FeatureLayer>
        </Map>

        @* Standard map widgets *@
        <ZoomWidget Position="OverlayPosition.TopLeft"/>
        <SearchWidget Position="OverlayPosition.TopRight"/>
        <ScaleBarWidget Position="OverlayPosition.BottomLeft"/>

    </MapView>
</div>
If you've used GeoBlazor before, this should look familiar — it's the same component-based markup you'd use in any Blazor app. The FeatureLayer loads railroad bridge data from an ArcGIS portal item, and renders each point with a custom PictureMarkerSymbol. We also include a few standard widgets for zoom, search, and scale.
Where it gets interesting is the click handler. When a user clicks a feature, we perform a hit test to figure out what they clicked on, build a FieldAsset from the graphic's attributes, and publish it through a shared service:
@code {
    private MapView? _mapView;
    private FeatureLayer? _bridgesLayer;

    private async Task OnMapClick(ClickEvent clickEvent)
    {
        if (_mapView is null) return;

        string objectIdField = _bridgesLayer?.ObjectIdField ?? "OBJECTID";

        HitTestResult hitTestResult = await _mapView.HitTest(clickEvent);
        ViewHit? hit = hitTestResult.Results.FirstOrDefault();

        if (hit is GraphicHit graphicHit)
        {
            Graphic graphic = graphicHit.Graphic;
            FieldAsset asset = new()
            {
                ObjectIdField = objectIdField,
                ObjectId = graphic.Attributes.TryGetValue(objectIdField, out object? oid)
                    ? oid?.ToString() ?? "Unknown"
                    : "Unknown",
                AssetType = "Railroad Bridge",
                Attributes = graphic.Attributes.ToDictionary()
            };
            Selection.Select(asset);
        }
        else
        {
            Selection.Clear();
        }
    }
}
The Cross-Boundary Bridge: AssetSelectionService
So the Blazor component runs inside a WebView, and the Uno XAML sidebar runs in native code. How do they talk to each other? Turns out it's pretty straightforward — a singleton service with C# events.
public class AssetSelectionService
{
    public event Action<FieldAsset>? AssetSelected;
    public event Action? SelectionCleared;

    public void Select(FieldAsset asset)
        => AssetSelected?.Invoke(asset);

    public void Clear() => SelectionCleared?.Invoke();
}
public class AssetSelectionService
{
    public event Action<FieldAsset>? AssetSelected;
    public event Action? SelectionCleared;

    public void Select(FieldAsset asset)
        => AssetSelected?.Invoke(asset);

    public void Clear() => SelectionCleared?.Invoke();
}
Since all three projects run in the same process, a static singleton is accessible from everywhere. The Blazor component calls AssetSelectionService.Instance.Select(asset) when a feature is clicked, and the Uno XAML page subscribes to the AssetSelected event. No message bus, no serialization, no JavaScript interop — just plain C# events crossing the boundary.
Step 6: Build the Native Sidebar
Now let's look at the Uno XAML side. MainPage.xaml in FieldAssetInspector defines a two-column grid: a sidebar on the left, and the embedded map on the right:
<Page ...
    xmlns:embed="using:Uno.Extensions.Maui"
    xmlns:controls="using:FieldAssetInspector.MauiControls">

    <Grid>
        <Grid.ColumnDefinitions>
            <ColumnDefinition Width="Auto" MinWidth="60" />
            <ColumnDefinition Width="*" />
        </Grid.ColumnDefinitions>

        <!-- Sidebar Panel -->
        <Grid Grid.Column="0" Width="320"
              Background="{ThemeResource CardBackgroundFillColorDefaultBrush}">
            <StackPanel Padding="16" Spacing="4">
                <TextBlock Text="Field Asset Inspector"
                           Style="{StaticResource TitleTextBlockStyle}" />
                <TextBlock Text="Powered by GeoBlazor + Uno Platform"
                           Style="{StaticResource CaptionTextBlockStyle}" />
            </StackPanel>

            <!-- Asset detail fields, shown when selected -->
            <ScrollViewer Padding="16">
                <StackPanel x:Name="AssetDetailsPanel" Visibility="Collapsed">
                    <TextBox x:Name="AssetIdField" Header="Asset ID" IsReadOnly="True" />
                    <TextBox x:Name="AssetTypeField" Header="Asset Type" IsReadOnly="True" />
                    <StackPanel x:Name="AttributeFieldsPanel" Spacing="8" />
                    <TextBox x:Name="AssetNotesField" Header="Inspector Notes"
                             AcceptsReturn="True" TextWrapping="Wrap" Height="100" />
                    <Button Content="Save Changes"
                            Style="{StaticResource FilledButtonStyle}"
                            Click="OnSaveChangesClick" />
                </StackPanel>
            </ScrollViewer>
        </Grid>

        <!-- Map Area (Blazor via MAUI Embedding) -->
        <embed:MauiHost Grid.Column="1"
                        Source="controls:EmbeddedMapView" />
    </Grid>
</Page>
Notice the MauiHost at the bottom — that single line is what embeds our entire MAUI BlazorWebView (and therefore our GeoBlazor map) into the Uno page. The Source attribute points to our EmbeddedMapView MAUI control.
The code-behind subscribes to the AssetSelectionService events and updates the XAML controls when a feature is selected:
public sealed partial class MainPage : Page
{
    private readonly AssetSelectionService _selection;

    public MainPage(AssetSelectionService selection)
    {
        _selection = selection;
        this.InitializeComponent();

        _selection.AssetSelected += OnAssetSelected;
        _selection.SelectionCleared += OnSelectionCleared;
        Unloaded += (_, _) =>
        {
            _selection.AssetSelected -= OnAssetSelected;
            _selection.SelectionCleared -= OnSelectionCleared;
        };
    }

    private void OnSaveChangesClick(object sender, RoutedEventArgs e)
    {
        // In a real application, this would persist changes to the feature layer
        // via GeoBlazor's ApplyEdits functionality.
        var dialog = new ContentDialog
        {
            Title = "Changes Saved",
            Content = "Asset attributes have been updated successfully.",
            CloseButtonText = "OK",
            XamlRoot = this.XamlRoot
        };
        _ = dialog.ShowAsync();
    }

    /// <summary>
    /// Called from the Blazor map component (via AssetSelectionService) when a feature is selected.
    /// Updates the Uno XAML sidebar with the selected asset's attributes.
    /// </summary>
    private void OnAssetSelected(FieldAsset asset)
    {
        DispatcherQueue.TryEnqueue(() =>
        {
            AssetInfoText.Visibility = Visibility.Collapsed;
            AssetDetailsPanel.Visibility = Visibility.Visible;

            AssetIdField.Text = asset.ObjectId;
            AssetTypeField.Text = asset.AssetType;
            AssetNotesField.Text = string.Empty;

            // Build editable TextBoxes for each attribute
            AttributeFieldsPanel.Children.Clear();
            foreach ((string key, object? value) in asset.Attributes)
            {
                if (key == asset.ObjectIdField)
                {
                    // we already posted the ObjectID at the top
                    continue;
                }

                TextBox textBox = new()
                {
                    Header = key,
                    Text = value?.ToString() ?? string.Empty,
                    PlaceholderText = "—"
                };

                AttributeFieldsPanel.Children.Add(textBox);
            }
        });
    }

    private void OnSelectionCleared()
    {
        DispatcherQueue.TryEnqueue(() =>
        {
            AssetInfoText.Visibility = Visibility.Visible;
            AssetDetailsPanel.Visibility = Visibility.Collapsed;
            AttributeFieldsPanel.Children.Clear();
        });
    }
}
One thing to watch for: the DispatcherQueue.TryEnqueue call. Since the event fires from the Blazor/WebView thread, we need to hop back to the Uno/WinUI UI thread before touching any XAML controls. If you've done any WinUI or UWP work, this pattern will be familiar.
Run It
Build and run the Windows target:
dotnet build FieldAssetInspector/FieldAssetInspector.csproj -f net10.0-windows10.0.26100
dotnet build FieldAssetInspector/FieldAssetInspector.csproj -f net10.0-windows10.0.26100
You should see the Uno app launch with the Material-themed sidebar on the left and a full ArcGIS map on the right. Click on a railroad bridge marker, and watch the sidebar populate with the feature's attributes in real time.
For Android:
dotnet build FieldAssetInspector/FieldAssetInspector.csproj -f net10.0-android
dotnet build FieldAssetInspector/FieldAssetInspector.csproj -f net10.0-android
The same code, the same map, the same interaction — running natively on Android.
What's Next
This gets the basic pattern working, but there's a lot you can build on top of it:
- More feature layers — add pipelines, utility poles, or any other ArcGIS dataset. The
FeatureLayercomponent makes it straightforward. - Custom popups — use
PopupTemplateto show in-map popups alongside the sidebar. - 3D — swap
MapViewforSceneViewand you get a 3D terrain view — imagine inspecting bridges with elevation context. - Editing — upgrade to GeoBlazor Pro and you can use the
EditorandFeatureFormwidgets andApplyEditsto write changes back to the feature service. That "Save Changes" button is just waiting to be wired up!
We started with a gap — Uno doesn't have BlazorWebView, and GeoBlazor doesn't know about XAML — and we bridged it with a small MAUI library, a singleton event service, and a few lines of DI wiring. Then we put actual bridges on the map, just to drive the point home.
The full source code is available on GitHub. If you have questions or want to share what you've built with GeoBlazor, join us on Discord or reach out at geoblazor@dymaptic.com.